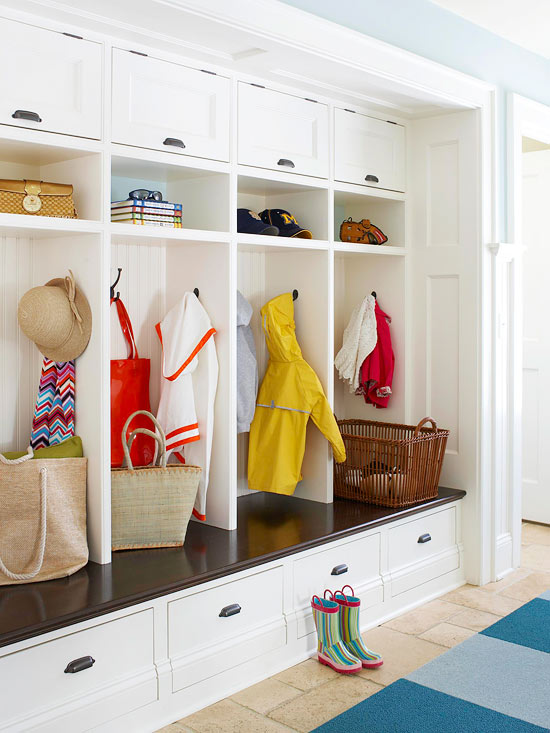
Movin’ On Out – Part 3: Moving Tips from a Boston Professional Organizer

Boston Professional Organizer Moving Tips

I’ve now walked you through the first two parts of staying organized during a move – planning and packing! – and now the real fun begins – unpacking. And I really mean this. This is the time where you can get settled and really take a deep breath and relish in the happiness of a new home. Before you start cutting open those boxes, keep these moving tips in mind.

  1. Cleaning is always a good idea— Most homes you move into will only have been broom swept, which means there is likely a lot of cleaning to do. It’s always smart to schedule a cleaner to arrive before the boxes do, that way you don’t have to worry about cleaning after the fact.
  2. Set up your beds – Sleep is oh-so important after working your tail off moving for the last few days (and technically, weeks, if you’ve been properly planning!). Bedrooms are quick to pull together, and you’ll be so excited to get proper rest on a familiar and comforting bed.
  3. Give the kitchen priority – Like sleeping, eating is a priority.  If you’ve done a good job organizing and labeling your boxes, it should be fairly easy to decide what box needs to be placed where. I also like to think of the sink as the main “hub” and the stove is second on the list of most-used kitchen spaces, so it’s key to unpack keeping this in mind. For the items that you use every day, place them in the most accessible spaces. Utensils and cutlery will always be used, so placing these items by the sink is a good idea.
  4. Bring home the bathroom – The bathroom is one of the most straight-forward rooms to set up and you’ll feel an instant sense of calm when you get yourself settled in this space. Put up a shower curtain, hang your towels and unload your grooming essentials.
  5. Think basement for any overflow – If you’ve planned and purged correctly (reference the first part of this series if you missed it!), you shouldn’t have anything substantial to store. However, if you do, take advantage of your basement. Anything you’d like to put down in your basement, store in those large plastic storage containers, to ensure the contents won’t get musty. Also, use shelving to maximize your storage space. I always like to use large resin shelving because it’s so easy to assemble, and you’ll be up-and-running in no time.

That wraps it up on my ‘Movin’ on out’ series on organization tips for moving – if you have any questions, comment below and I’d love to help! Tune back in the coming weeks as I talk about garage organization!

Photo: Apartment Therapy

Movin’ On Out – Part 2: Moving Tips from a Boston Professional Organizer

Boston Professional Organizer moving box labels

Welcome back to our series on planning and packing for a move! In the first part of this series I discussed planning – which is equally as important as the actual execution – but now I’m moving on (pun intended) to the good stuff – packing up your home. As a professional organizer in Boston, I’ve discovered some key moving tips to keep in mind while getting all of your belongings out of your home, and into a moving truck. It may seem like a daunting task, but if you follow the five packing tips below, you’ll be in great shape.

  1. Pack by room – Life becomes significantly easier when you pack by room. By doing this, you’ll keep all similar items organized together and ultimately make unpacking more manageable. The last thing you want to do in your new home is run around the house, scratching your head, saying, “Now what did I do with that lamp?”
  2. Learn love labeling – This is another tip that will keep you sane through the moving process. Every box needs a label. There’s no way around it. On each label, you should note the room, general contents, and assign a box number to make tracking all boxes a bit easier. I also like to include a color key for each room, so that it’s easier for the movers to easily note what goes where. I discovered this free download for moving labels from MarthaStewart.com that you can print out on any standard adhesive paper and use for your move.
  3. Keep your boxes organized with a grid – Use a simple word document or excel sheet to keep track of all of your boxes. I generally write out each room, and underneath include the box number and the general contents in each. This is where I also include the color key.
  4. Find the right boxes – There is a wide world of boxes, and it’s important you find the right boxes to make your packing a bit easier. In addition to square or rectangle boxes, you can also find specific boxes for picture frames, hanging clothing, glassware, TVs, lamps and more. If you want to save money, I’d recommend looking on Craigslist for used moving boxes from someone who just unpacked and moved into their new home. You can also find great boxes behind grocery stores, and sometimes liquor stores will have odd-shaped boxes with built in dividers for vases and glassware. Keep in mind that not all things need boxes. For instance, folding clothes can remain in the dressers, but be sure the drawers are restrained with tape to ensure drawers don’t fall out.
  5. Think about what you’ll need when you arrive – You should always pack an “open first” box. This will contain necessities like toilet paper, trash bags, power strips, tools, box cutters, and medication. For this box, I always like to use a clear bin versus a brown box so it’s distinctive and easier to see among the sea of brown. Additionally, if you’re traveling across the country, be sure to pack enough clothing and essentials for two to three days. If your moving truck gets delayed because of weather, you never want to be without the essentials.

After you’re done packing…it’s time for the BIG MOVE. Tune in next week as I share tips to the art of unpacking and moving into your new home.


Photo: Design Mom

Happy 4th of July!

Boston Professional Organizer

Happy 4th of July! There’s no better place to be on the Fourth of July than in the great city of Boston. Enjoy this day with your family – happy Independence Day to you all!

Photo: Huffington Post

Movin’ On Out – Part 1: Moving Tips from a Boston Professional Organizer

Boston Professional Organizer Moving

Moving is bittersweet. On one hand there are new beginnings on the horizon – new house, new city, new fun! – but on the other hand … you need to MOVE. To some, this is a four-letter word. I haven’t met many people who really enjoy the process of moving. After all, it takes time to mentally – and physically organize – then purge, pack, and move out…and then move in and essentially do the aforementioned tasks once again.

The good news is that I’m here to help those in the Boston area planning a move by sharing organization tips for moving. Over the course of the next three blog posts, I’ll share my professional moving tips that will help your next move run as smooth as possible.

Today’s post is centered around the three p’s – planning, prepping and purging. Below are five moving tips to keep in mind as you get the moving train moving:

  1. Start planning your move two months out – Put together a packing plan for what you want to accomplish over the course of the next two months. This plan can include deadlines for when certain rooms in the house need to be packed. For example, one month out start to pack up the garage and attic. Then 2-3 weeks pack up the closets. You get the picture. Also include action items for when you should call and transfer/cancel utility services, forward your mail, update your personal billing information, etc.
  2. Think about boxes and packing supplies – Do not wait until the last minute to purchase these supplies, or find the right boxes. You don’t want to get in a situation when you’re in need of boxes the day the moving trucks arrive! Also, pick up other supplies to keep you organized like labels and color sharpies so you can color code by room (more on that in the next post!).
  3. Schedule your movers –Don’t wait to do this! Planning a New England move in the summertime means moving companies will be booked out. Call ahead of time to ensure you’ll get your top choice for moving company.
  4. Take Measurements at your new home – You’ll inevitably move to an entirely different home, which means what you have in your current home will likely not work in your new one. If you’re able, take measurements of your new home so you can get an idea of what furniture will make the cut for the move. If something won’t fit, it’s best to sell or purge that item so that you can minimize moving unnecessary items.
  5. Trash and Donate – As mentioned above, the last thing you want to do is move stuff you don’t need! Before you move, go through clothing, furniture, etc. you want to give away or throw away. The more upfront time spent doing this now, the more time and stress you’ll save yourselves. If you opt to make a donation, find organizations that will pick up like the Vietnam Veterans of American and Big Brothers Big Sisters. If you prefer to drop off, Goodwill and Salvation Army are easy and in many spots across New England.

After you’ve mastered the three p’s, the next step is to physically pack! Tune back next week for part 2 in my moving tips series when I discuss how to pack a house – the right way!

Photo: Crafty Individuals

How to Tackle Your Semi-Annual Clothes Swap

I know it is spring because I have been helping a number of my clients organize their bedroom closet. We have been doing the semi-annual seasonal clothes swap.  Once it is done, everyone breathes a sigh of relief, but getting started can be stressful. Here are some questions to ask yourself before you just pack everything away for the summer.

  • Did I wear it? If you never wore it this past winter, it is a great candidate for the donation pile. A great trick I like using is to hang my items with the hanger backwards so that it is very easy to spot the items that never left their hanger. When I wear an item and put it back clean, the hanger is placed in the normal position. When it is time to pack it away, you can’t help but see that you never wore it. Our memory may fade, but that would serve as 100% proof that a garment wasn’t worn.
  • Is it clean? Make sure all your items are clean before packing them away. Bugs love to chomp on left over food crumbs or dead skin, so make sure you have washed or dry-cleaned your items first.
  • Does it need to be repaired? Now is the time to sew on the button or go to the tailor before you put away your winter clothes. By so doing, in 6 months when you want to wear that item, it is ready to wear.  If the item is beyond repair or not worth being repaired, let it go.
  • Will it be in style next season? If you care about trends and know that its time has come and gone, don’t pack the item away. Donate it, and perhaps treat yourself to a new trend for this season.

Tips on How to Manage Your Time

Where is My Time Going?

We all have the same amount of time in a day, yet why are some people able to get it all done? Well, they tend to use a calendar or daily planner and block time out to do so. Here are some other tips:

  • Know your most productive time of the day. Are you a morning person and love to get items crossed off your list so that you can enjoy the rest of the day and tackle unplanned interruptions? Or do you do better after lunch when you know you have a crunch time before the kids come back home or it’s quitting time at work? For you, it may be easier to get the phone calls and emails out of the way and focus on the real tasks after the mundane is done.
  • Write it down. Plan how you will spend your time each day. Looking at your calendar will avoid overscheduling and double booking. Take your action list and write down in your calendar when you will accomplish those tasks.
  • Prioritize. Not every item on your list is time sensitive. Look at your list and choose the most important tasks. Do them first! Less important tasks may suck too much time out of your day, and then you will be rushing to get the time sensitive tasks done.
  • Practice saying no. If asked to do something that isn’t in line with your goals, it is OK to say no. Don’t let others guilt you into saying yes. Your time is valuable, and having and using a calendar that is planned out will help you know that you may not have time to take on another project.
  • Watch out for distractions. When working on your tasks, silence your phone, shut off your computer, and close your door. Make sure you are able to concentrate and get to the task at hand. If you need to change locations to help avoid tempting distractions, do it!

Managing your time will help you not only get more done but also help you feel more in control of you time and how you choose to spend it.

How to Keep Your 2013 Goals/Resolutions

Happy New Year!  We are already well under way in 2013, and I hope that if you made any New Year’s resolutions, you didn’t make them so grandiose that they have already been broken. We are going to talk about some ways to ensure your success in whatever your goals/resolutions are for this year.

  1. Make them specific and obtainable.
  2. Choose no more than three.
  3. Write them down.
  4. Read them out loud at least once a day. Believe that you will accomplish your goals when you say them.
  5. Re-evaluate them after 2 months.

If one of your goals/resolutions is to pay your bills on time to avoid late fees, to be on time for meetings and appointments, to finally create order out of your piles of paperwork, and/or to maintain an organized kitchen/bedroom/office (you fill in the room or area), call Resolutions. Together we will work to make your goal/resolutions a reality for 2013!

How to Organize Your Kitchen

This is the time of year where we are more likely to find ourselves in the kitchen baking and whipping up cauldrons of soups and casseroles. Having the oven on is a great way to help warm up the house and make it smell yummy. A more organized kitchen really does make the time you spend in your kitchen more enjoyable.

Here are a few tips to make your kitchen more functional:

  1. Group together commonly used items for purposes such as baking and assign them a home.
  2. Organize your space by use. Keep the items you use most frequently in your prime real estate area. Keep less frequently used items like holiday & entertaining pieces up higher or stored outside of the kitchen if space is at a premium.
  3. Set up zones near the devise being used. For example, store your cookware near the stove and all your coffee and related items near the coffee maker.
  4. Contain your plastic storage. Keep only matched tops and bottoms, and store them together to make it easy to grab for leftovers.
  5. Put like with like in your pantry just as you see in the grocery store. It makes food prep and shopping lists a breeze.

Organizing for Summer Vacation: Road Trip Tips

Here are some tips to help you as you are organizing a summer road trip:

  • Make sure your car has been properly maintained. You don’t want any interruptions in your road trip because you failed to get your oil changed or checked your tire pressure.
  • Even if you do have a GPS device, it is not a bad idea to also have a detailed map for your travels. How annoying is it when your GPS can’t find your location and you end up driving blind?
  • Get rid of junk in your car. Spend the time getting rid of any accumulated trash, papers, water bottles, and other items that aren’t needed on your trip. How nice will it be to start the trip with a clean slate? Remember you are in tight quarters, so every inch counts.
  • Plan for boredom. Hopefully it won’t happen, but just in case, have a bag of games or activities so that the entire car can participate. A favorite one is having everyone look for state license plates. Print out a list all the states, and cross them off as you see them. How about audio books geared toward your final destination?
  • Be prepared for the unexpected. Bring a weather radio so that you can track a storm or weather pattern. Make sure your phone is charged in case you need to call for help. (Not a bad idea to make sure you have a car charger for your phone) Always lock your car even if you just step away for a second. Have a spare set of car keys made and give them to someone else in your party.

May is National Moving Month

We are heading into the summer months and this is a popular time of the year for families to move. The kids are out of school, so there are fewer interruptions in their lives and, if moving out of town, the transition is easier on them.

Moving can be stressful. If you make a plan and pack in an organized fashion, you really can alleviate a lot of headaches. Here are a few tips to help you pack for a move:

1. Label at least 2 sides of each box. Label the long and short sides of the boxes. This way when the movers bring the boxes into your new space, you can ask them to make sure the labels face out and therefore, depending on how they stack them, the boxes will either have the label on the short or long side facing out.

2. Be specific when labeling. Don’t just write ‘Kitchen’ on all your kitchen boxes. That won’t be helpful when you are unpacking and looking for specific items like your pots & pans, drinking glasses, coffee mugs, or silverware.

3. Color coordinate your move. Choose a color for each room and then use that color label or dot for each box going into that room. Create a cheat sheet for yourself and the movers. Make a sign for each room with that color label or dot on it and hang it on the outside of the room so movers know what room you want the boxes and furniture to go into. For example,
kitchen = red, master bedroom = blue, office = green, etc.

4. Designate one area as packing central. Keep markers, packing tape, labels, colored dots, packing material, boxes, and other critical items together. When you are done packing for the day, make sure all items go back into that area.

5. You will always need more tape, boxes, and packing material than you think. Save your receipts and don’t skimp on supplies.

If you need help establishing homes and editing your belongings, call or email to set up an appointment. Resolutions is your Link to an Organized Future!

Top